In this page
I have the info you need to get you going on the road to skinning
you're favorite model with your own custom skin !
First of all you will need
to get you a decent graphics proggy (program) for editing your
skin, I suggest Paint Shop Pro 7 or the newest. If you have it
great if not the hyperlink to get it is below. Along with Paint
Shop Pro (or any other graphic editing tool) you will need
winzip, that is also available for download below.
This is
a basic skinning tutorial aimed at anyone who wants to know how
to make and use a new skin in the PC version of Quake 3. If there
is anything that you think needs to be clearer or you are having
problems then feel free to email me and I'll see what I can do to
help. All I ask is that you make sure you have read all the
tutorial first.
Tools
Required:
--Programs you will
need--
Paint
Shop Pro 7 or some other graphics editor :)
WINZIP - New to WINZIP?? Check out
our tutorial
Download the program here - >
WINZIP
- Art package - You
will need an art package of some kind that supports the
editing and saving of TGA images. I use Paintshop Pro.
- Zip utility - In
order to make or open .pk3 files
you will need a file compression utility such as WinZip.
- Text editor - To
edit the .skin
files you just need a basic editor such as Notepad.
- Quake 3 Arena or
some form of model viewer - In order to see or play your
creations you of course need the game itself. However you
can still make new skins without Quake 3 if you can find
a good model viewer (you obviously can't play them
though!). If you can recommend a viewer then please do.
- Quickview Plus -
you don't need this at all but I find it quite helpful
for viewing .pk3
files instead of WinZip because it shows directory paths
nice and clearly.
Tutorial:
- Setting up a
directory structure in which to work
- Open up
Windows Explorer and find your Quake3 game
directory on your hard drive.
- In the
main directory you will find a sub-directory
called baseq3.
This is where any new .pk3
(explained later) files will be placed.
- Create a
new directory in baseq3
and call it something like 'steves_models'.
- Inside
this directory create another directory called 'models'
- Finally in
this directory create another directory called 'players'
and then in there create a directory with the
same name as the skin you are going to make. The
diagram below should help
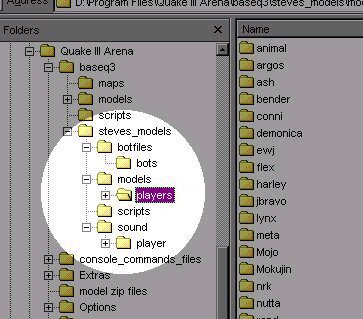
The
extra directories that you can see in the diagram are not
necessary for a simple skin. They are used for botfiles (computer
controlled opponents) and sounds. You can ignore these for this
tutorial.
Player
files explained
The
diagram below shows the files that you now need to place
in your quake3/baseq3/steves_models/models/players/skin
name directory:
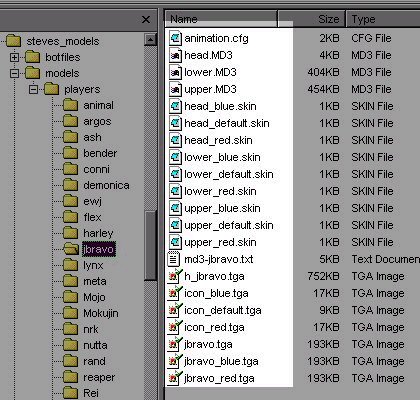
These files are:
- animation.cfg
- This file controls how your chosen model moves. You
will not be touching this but it needs to be in this
directory.
- various.MD3
- There will be a number of these .MD3
files. These are the models files, you can think of them
as wire mesh skeletons that your new skin is going to
wrap around. Like the animation file you will not be
touching these. This tutorial does not cover model
making.
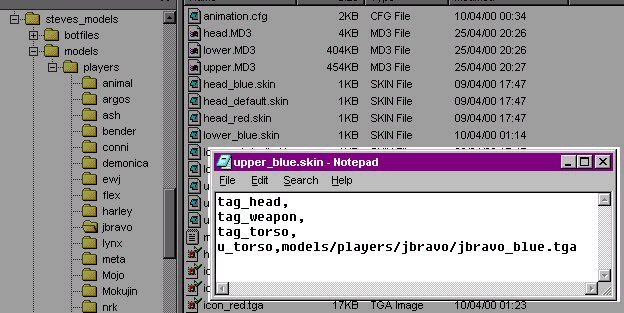
- various.skin
- These files tell Quake 3 which bits of your new skin
picture are wrapped around which bits of wire frame
model. They are simple .txt
files renamed as .skin
and are the usual culprits for broken skins. The picture
below shows the contents of one of these files. You will
notice the presence of a directory path - this points to
the skin picture to be used and is the bit that is
usually wrong.
various.txt
- This is not important and is usually just a description
of the skin and who made it.
icon_various.tga
- This is a picture in TGA format that the game uses as
the player icon. (All of the skins can be saved as 24 or
32 bit TGA's, however, the icon has to be saved as a 24
bit icon or it won't work at all - thanks to John Duperon
for the tip). Here is an example:

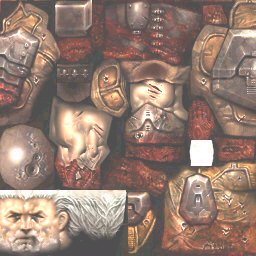
various.tga
- The rest of the TGA pictures are the actual skins
themselves. Below is the skin TGA for the Sarge model.
This is the thing you have to edit to create a new skin.
You can paint it blue black or whatever, put your name
across the chest, BUT please do note, that when your
painting on this TGA file its a mirror effect, if you
paint on the left side of the chest it will reflect out
to the right. Hense the whole chest will get the image
not just the left.
skin_name.pk3
- The final file you have to know about is the .pk3
file.
This is just a compressed (ZIP) file of all the files in
your working directory just renamed from .zip
to .pk3 and placed in
the baseq3 directory.
An explanation of how to do this is given
below.
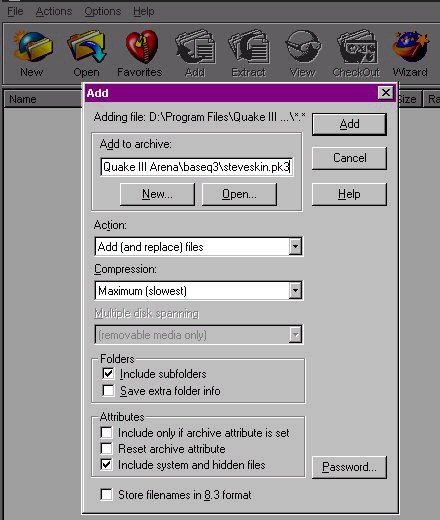
- Right click on
your 'steves_models'
directory and select 'add to zip'.

Type
in a path for where WinZip places the final .zip
file so that it ends up in the baseq3
directory. The level of compression you use is up to you
Quake3 doesn't mind. Do ensure that the directory structure
is retained in the .zip
file and that all files will be included by selecting 'include
subfolders'. The file won't work if the
directory structure isn't in it.
Let
WinZip create the .zip
file and then go to the baseq3
directory and change the name of the .zip
file to .pk3. Ignore
any warnings that Windows gives you. You should now see
something vaguely like the diagram below (but with your file
name obviously):
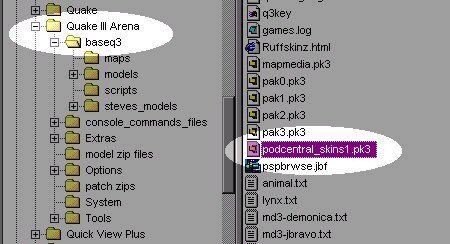
- So
where do I get the files needed to do all this?
Have
another look at the diagram above. You will see
that my .pk3
file isn't the only one in the baseq3
directory. All of the normal models that come
with the game are in pak0.pk3
and so this is where you will get all of your
working materials, unless of course you can make
your own, but then if you could do that you
wouldn't be reading this! Lets say you wanted to
make a new skin for the Sarge model, Also if you
wanted to edit a skin you have downloaded, use
the same idea as in the pak0 pak3, open it with
winzip! And then select the files specified.
|
- So
where do I get the files needed to do all this?
Have
another look at the diagram above. You will see
that my .pk3
file isn't the only one in the baseq3
directory. All of the normal models that come
with the game are in pak0.pk3
and so this is where you will get all of your
working materials, unless of course you can make
your own, but then if you could do that you
wouldn't be reading this! Lets say you wanted to
make a new skin for the Sarge model, Also if you
wanted to edit a skin you have downloaded, use
the same idea as in the pak0 pak3, open it with
winzip! And then select the files specified.
- Make
a copy of the pak0.pk3
file.
- Double
click on it and associate it with WinZip.
If you have trouble doing this then just
rename it from pak0.pk3
to pak0.zip.
- Open
the file and extract the files under models\players\sarge
to your models\players\skin
name working
directory.
- Delete
the additional files for the sarge
varients such as red,
blue, roderik, krusade
etc because you don't need them.
- You
should now be left with the basic files
and should try just editing the band.tga
file which should look exactly like the
example TGA file above. Actually Sarge is
a bad example to use because his TGA file
is called such a bazarre name and he
needs the little extras like cigar.tga.
Usually the main TGA is called
default.tga or skin_name.tga. Just
experiment by putting glasses or a beard
on him or something.
- Finally
open all the .skin
files and change the directory paths from models/players/sarge/band.tga
to models/players/your
skin name/your skin file name.tga
- You
should be able to view your model in
Quake3 now, however you won't be able to
play with it until you create a .pk3
file.
- Additional
things to know
- Only
people with your skin their directory
will be able to see you wearing your skin
in the game (they don't have to have it
selected though). So when you have made
one, send them a copy!
- Only
skins made for a specific model will work
with that model.
- I
know nothing about making new models.
- Make
sure your icon, skin files and skin TGA
files have the right names.
- If
it doesn't work check your .skin
files first then your file names then
compare what you have to what is in the pak0.pk3
file for the model you have used.
- Avoid
adding to the Quake .pk3 files because
they will no doubt be replaced whenever
you download a new patch.
- Make
sure you have the latest Quake 3 Patch.
- Don't
worry if your skin looks dark or rubbish
in the art package, it will look much
better in the game thanks to shadows.
- Some
of the models have special effects on
their bodies. I have no idea how you get
these!